
No-nonsense 2025 tutorial (with code, images and examples)
I am building Frontera, a web application where I need to showcase a lot of landing pages/home pages of various websites and software products.
So I needed screenshots. A lot of screenshots!
I found some APIs but almost none were free. Even if they were, I didn’t want to pay, as currently I am just focused on creating the MVP.
So, let’s cut the chat.
Here’s how you can build your own Node.js/Express screenshot project where screenshots will be taken once you run your code!
Just like that.
Prerequisites
1. Create a Node.js project
npm init -y
2. Install Express
We will build our server using Express, a Node.js framework. You must have used this or seen it 🙂
npm install express nodemon
Note: We will also install
nodemonpackage to automatically run our project without the need of closing and restarting the server.
3. Create index.js file for the server code
Create an index.js file in the root directory. Paste the code below:
const express = require("express");

const PORT = process.env.PORT || 3011;
const app = express();

app.listen(PORT, () => {
  console.log(`listening to port: ${PORT}`);
});
And make the following changes to your package.json file:
{
  "name": "screenshot-nodejs",
  "version": "1.0.0",
  "main": "index.js",
  "scripts": {
    "start": "node index.js",
    "dev": "nodemon index.js",
    "test": "echo \"Error: no test specified\" && exit 1"
  },
  "keywords": [],
  "author": "",
  "license": "ISC",
  "description": "",
  "dependencies": {
    "express": "^5.1.0",
    "nodemon": "^3.1.10",
  }
}
4. Install Puppeteer
The most essential thing in our project!
Using Puppeteer, we will take the screenshots of the landing pages by opening them in a new browser automatically.
npm install puppeteer
Before that…
Thought process
- As a start, I will have an array of objects where each object will contain:
{ name: "linear", url: "https://linear.app" }
- I will loop through this array and with puppeteer, open each URL and then take a screenshot.
- Next, I will save each screenshot in a folder in my root directory.
- Repeat the process for every object in the array.
Full Code:
const puppeteer = require('puppeteer');
const fs = require('fs');
const path = require('path');
// List of sites you want to screenshot
const sites = [
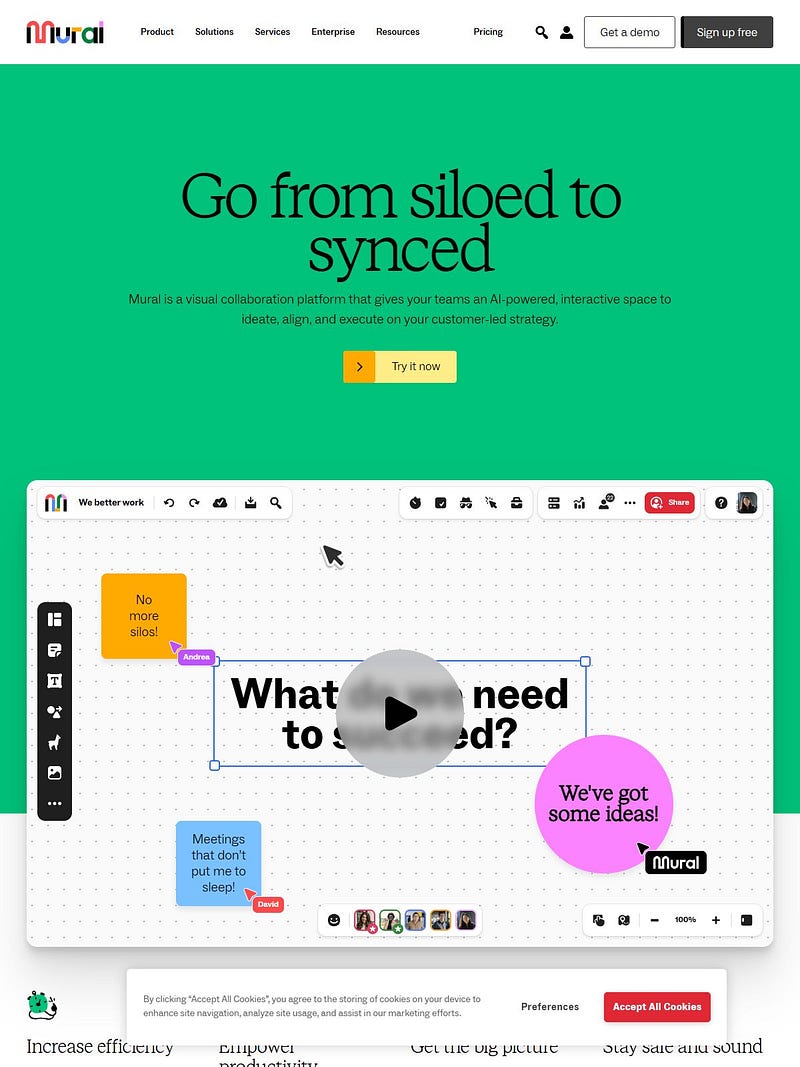
{ name: 'nike', url: 'https://www.nike.com' },
{ name: 'paypal', url: 'https://www.paypal.com' },
{ name: 'google', url: 'https://www.google.com' },
{ name: 'lovable', url: 'https://www.lovable.dev' }
];
// Ensure screenshots folder exists
const outputDir = path.join(__dirname, 'screenshots');
if (!fs.existsSync(outputDir)) fs.mkdirSync(outputDir);
(async () => {
const browser = await puppeteer.launch({
headless: 'new',
defaultViewport: {
width: 1200,
height: 1600,
},
});
const page = await browser.newPage();
for (const site of sites) {
try {
console.log(`📸 Capturing: ${site.url}`);
await page.goto(site.url, {
waitUntil: 'networkidle2',
timeout: 60000,
});
const filename = `${site.name}.jpg`;
const filePath = path.join(outputDir, filename);
await page.screenshot({
path: filePath,
fullPage: true,
type: 'jpeg',
quality: 80,
});
console.log(`✅ Saved: ${filePath}`);
} catch (err) {
console.error(`❌ Failed to capture ${site.url}:`, err.message);
}
}
await browser.close();
})();
What happened in the above code?
- I imported the required packages.
const puppeteer = require('puppeteer');
const fs = require('fs');
const path = require('path');
sitesarray: contains all the sites that I need the screenshot of, you can add more.
// List of sites you want to screenshot
const sites = [
  { name: 'nike', url: 'https://www.nike.com' },
  { name: 'paypal', url: 'https://www.paypal.com' },
  { name: 'google', url: 'https://www.google.com' },
  { name: 'lovable', url: 'https://www.lovable.dev' }
];
- I ensured that the
screenshotsfolder exists in the root directory. If it doesn’t exists, create it.
// Ensure screenshots folder exists
const outputDir = path.join(__dirname, 'screenshots');
if (!fs.existsSync(outputDir)) fs.mkdirSync(outputDir);
Now comes the Puppeteer code.
- I launch the browser in a headless mode (no UI) with a window size of 1200px x 1600px, means screenshot of this viewport size will be taken.
const browser = await puppeteer.launch({
  headless: 'new',
  defaultViewport: {
    width: 1200,
    height: 1600,
  },
});
- Of course, you can alter the sizes and see which one works best for your use case 🙂
- I open a new page.
const page = await browser.newPage();
- I start the iteration from the first element of the
sitesarray
for (const site of sites) {
  // ....
- I tell Puppeteer to go to the specific URL, wait for the content and all its assets (images, videos, fonts, scripts) to mostly load.
await page.goto(site.url, {
  waitUntil: 'networkidle2',
  timeout: 60000,
});
For the above, I have kept the timeout limit to 60 seconds.
This means, for each page, if the request to open the site URL on a new page takes more than 60 seconds, it will fail to take a screenshot and we will move on to the next site.
- Next, I assign a name to the screenshot that will be taken by Puppeteer and the path where it will store the image.
const filename = `${site.name}.jpg`;
const filePath = path.join(outputDir, filename);
- Finally, I take the screenshot with the
screenshot()method.
await page.screenshot({
  path: filePath,
  type: 'jpeg',
  quality: 80,
});
Above, if you want to take the screenshot of the full screen you can add one more key value pair:
await page.screenshot({
  path: filePath,
  fullPage: true,  // add this to take full page screenshots
  type: "jpeg",
  quality: 80,
});
- After the screenshot operation and repeating it for all the sites in the array, I closed the browser.
await browser.close();
Output
Your screenshots will get stored in the screenshots folder.
And you will get something like this as the output:


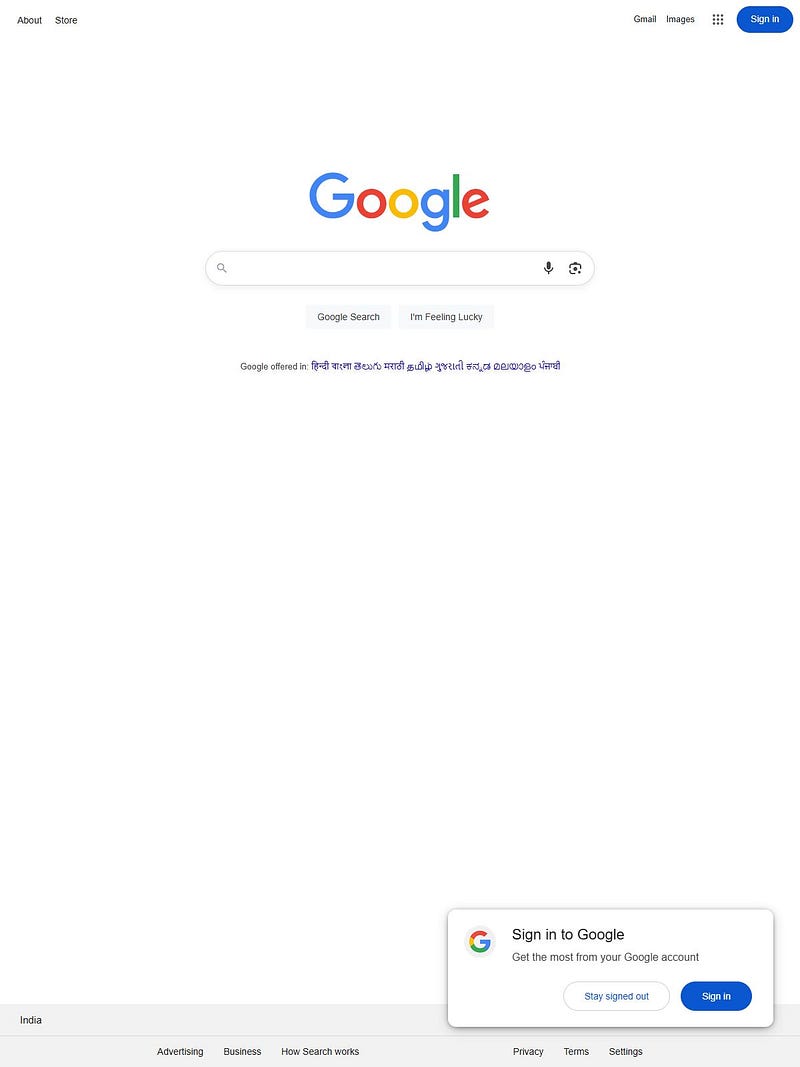
Pretty cool, isn’t it?
Errors encountered
Development without errors? Haha, this isn’t utopia, my friend!
1. Name not resolved
Faced this error a few times, was able to resolve it after just restarting the server with npm run dev

2. Navigation timeout
Common error of session timed out.

Fixed this by increasing the timeout limit to 120000 ms.
await page.goto(site.url, {
  waitUntil: "networkidle2",
  timeout: 120000,
});
3. Failed to make a stable connection
Sometimes, Puppeteer could fail to continue the connection before even taking the screenshot.

Implemented a bunch of changes for this in code:
- Open new page for each site instead of a single page for everything.
- Change the
waitUntilproperty todomcontentloaded. - Handled anti-bot mechanism as some sites might disable headless browsers.
Improved Code
const express = require("express");
const puppeteer = require("puppeteer");
const fs = require("fs");
const path = require("path");

const PORT = process.env.PORT || 3011;
const app = express();

const sites = require("./data/sites");  // array of 'sites' coming from sites.js

// Ensure screenshots folder exists
const outputDir = path.join(__dirname, "screenshots");
if (!fs.existsSync(outputDir)) fs.mkdirSync(outputDir);

(async () => {
  const browser = await puppeteer.launch({
    headless: "new",
    defaultViewport: { width: 1200, height: 1600 },
    args: [
      "--no-sandbox",
      "--disable-setuid-sandbox",
      "--disable-dev-shm-usage",
    ], // Optimize for stability
  });

  for (const site of sites) {
    let page;
    try {
      const filename = `${site.name}.jpg`;
      const filePath = path.join(outputDir, filename);

      if (fs.existsSync(filePath)) {
        console.log(`! Screenshot already exists for ${site.url}: ${filePath}`);
        continue;
      }

      console.log(`📸 Capturing: ${site.url}`);
      page = await browser.newPage();

      // Set a realistic user agent to avoid bot detection
      await page.setUserAgent(
        "Mozilla/5.0 (Windows NT 10.0; Win64; x64) AppleWebKit/537.36 (KHTML, like Gecko) Chrome/129.0.0.0 Safari/537.36"
      );

      // Navigate with a longer timeout and lenient wait condition
      await page.goto(site.url, {
        waitUntil: "domcontentloaded", // Use 'domcontentloaded' for faster loading
        timeout: 120000, // Increase timeout to 2 minutes
      });

      // Wait for additional time to ensure dynamic content loads
      await new Promise((resolve) => setTimeout(resolve, 5000));

      await page.screenshot({
        path: filePath,
        fullPage: false,
        type: "jpeg",
        quality: 80,
      });

      console.log(`✅ Saved: ${filePath}`);
    } catch (err) {
      console.error(`❌ Failed to capture ${site.url}:`, err.message);
      // Optionally, add retry logic here
    } finally {
      // Close the page to free resources
      if (page) await page.close();
      // Add a small delay between captures to avoid overwhelming the browser
      await new Promise((resolve) => setTimeout(resolve, 1000));
    }
  }

  await browser.close();
  console.log("✅ All captures completed.");
})();

app.listen(PORT, () => {
  console.log(`listening to port: ${PORT}`);
});
In the above code, also added a check to see if the image already exists, don’t take a screenshot again for the same site. This will save some resources and time, of course.
const filename = `${site.name}.jpg`;
const filePath = path.join(outputDir, filename);

if (fs.existsSync(filePath)) {
  console.log(`! Screenshot already exists for ${site.url}: ${filePath}`);
  continue;
}
This will print on the log if the image exists.


Output folder: screenshots

What went wrong?
Some of the screenshots didn’t output correctly. It might be that those sites took more time to load as the assets could be of more size or there could be use of heavy animations.


That’s it!
Now you have it. There’s your own Node.js code that can take screenshots of any website!
Next steps
- Compress/resize images with
sharplibrary - Store the images to AWS S3/Cloudinary/Supabase/Firebase, etc instead of storing on your server itself
- Convert this into an API and start charging for it lol