Here, I do a quick comparison between arguably the two most used Generative AI tools, OpenAI ChatGPT and Google Gemini, as a Frontend Developer with 2 yrs+ experience.
Criteria
- DSA (Easy level)
- UI component creation
- Extract data from image and convert to HTML
Let’s start then.
1. DSA Problem
Sometimes, frontend developers get asked DSA questions too during interviews, so let’s give an easy problem of determining if a number is a palindrome or not.
A palindrome number is a number that reads the same forward and backward. In other words, if you reverse the digits of the number, it remains unchanged.
Example: 121 → reversed is 121 (same) hence, a palindrome
Prompt: “Write a JavaScript program to determine if a number is a palindrome or not. Write it using a while loop.”
ChatGPT
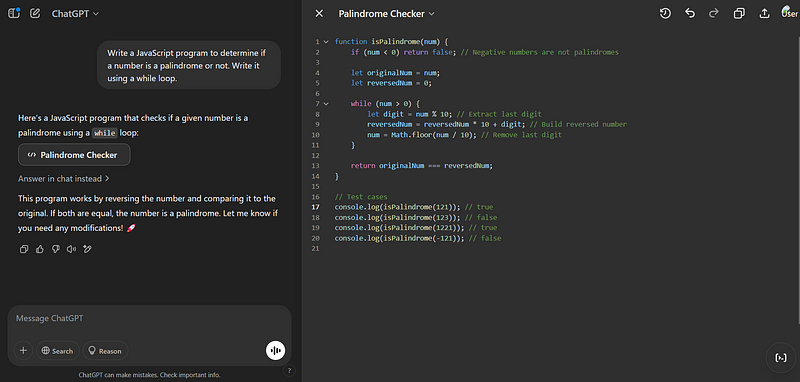
Right off the bat, GPT 4 Turbo provides the response in an additional canvas view, which is kind of cool.
It outputs the program with quite a bunch of helpful comments and it lists down 4 test cases for the isPalindrome function invocation.
Gemini
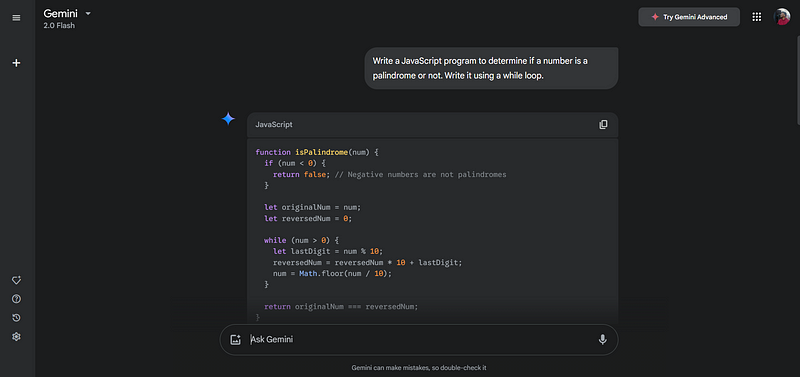
On the other hand, 2.0 Flash of Gemini gives me the program, which is more or less same as the one given by GPT, but it doesn’t have the comments listed there except for one.
But what it does offer is that it gives an explanation of the whole program below it in plain text. Also, it lists down 7 test cases, 3 more than ChatGPT, especially with “0” as an argument.
Differences
| ChatGPT | Gemini |
| Good and ample amount of comments | Very few comments |
| No code explanation | Vast code explanation |
2. Build a UI Component
Frontend developers cannot live without the good old UI components.
It is often helpful to just ask these GenAI tools to generate UI components so that we can have a good boilerplate code to start with. And then we can build on top of that.
Here in my Next.js application, I want to display a lot of cars on the page and the data is coming from an API.
Prompt:
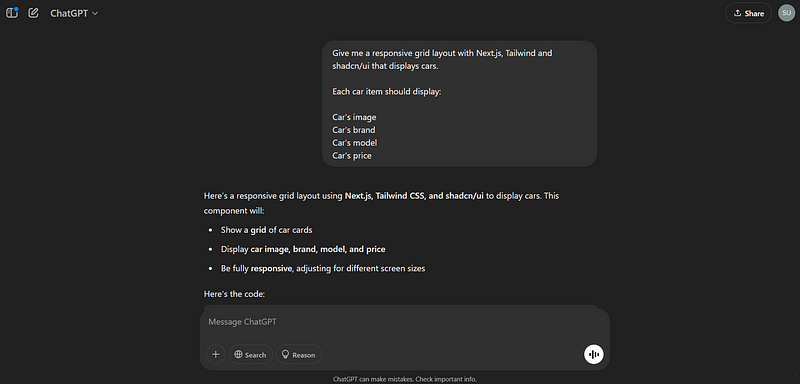
Give me a responsive grid layout with Next.js, Tailwind and shadcn/ui that displays cars.
Each car item should display the car’s:
- Image
- Brand
- Model
- Price
ChatGPT
Here’s the full code ChatGPT provided me with:
"use client";

import Image from "next/image";
import { Card, CardContent } from "@/components/ui/card";

const cars = [
  {
    id: 1,
    image: "/cars/tesla.jpg",
    brand: "Tesla",
    model: "Model S",
    price: "$80,000",
  },
  {
    id: 2,
    image: "/cars/bmw.jpg",
    brand: "BMW",
    model: "M4",
    price: "$75,000",
  },
  {
    id: 3,
    image: "/cars/audi.jpg",
    brand: "Audi",
    model: "RS5",
    price: "$85,000",
  },
  {
    id: 4,
    image: "/cars/mercedes.jpg",
    brand: "Mercedes",
    model: "AMG GT",
    price: "$120,000",
  },
];

export default function CarGrid() {
  return (
    <div className="container mx-auto px-4 py-8">
      <h2 className="text-3xl font-semibold mb-6 text-center">Available Cars</h2>
      <div className="grid grid-cols-1 sm:grid-cols-2 md:grid-cols-3 lg:grid-cols-4 gap-6">
        {cars.map((car) => (
          <Card key={car.id} className="overflow-hidden shadow-lg">
            <Image
              src={car.image}
              alt={`${car.brand} ${car.model}`}
              width={400}
              height={250}
              className="w-full h-48 object-cover"
            />
            <CardContent className="p-4">
              <h3 className="text-lg font-bold">{car.brand}</h3>
              <p className="text-gray-600">{car.model}</p>
              <p className="text-green-600 font-semibold">{car.price}</p>
            </CardContent>
          </Card>
        ))}
      </div>
    </div>
  );
}
It’s a good thing that it even gave the data of the cars, so that we can have a nice template for our reference. Later we can just alter it a bit to include data coming from any other source.
But I only need the grid layout, so I will just copy this code into my project.
<div className="grid grid-cols-1 sm:grid-cols-2 md:grid-cols-3 lg:grid-cols-4 gap-6">
  {cars.map((car) => (
    <Card key={car.id} className="overflow-hidden shadow-lg">
      <Image
        src={car.image}
        alt={`${car.brand} ${car.model}`}
        width={400}
        height={250}
        className="w-full h-48 object-cover"
      />
      <CardContent className="p-4">
        <h3 className="text-lg font-bold">{car.brand}</h3>
        <p className="text-gray-600">{car.model}</p>
        <p className="text-green-600 font-semibold">{car.price}</p>
      </CardContent>
    </Card>
  ))}
</div>
And if I just update the values of the below attributes according to my API response:
key={car._id}src={car.img.url}{car.price.ex_showroom}- I also changed the Next.js
<Image>component to the native HTML<img>tag.
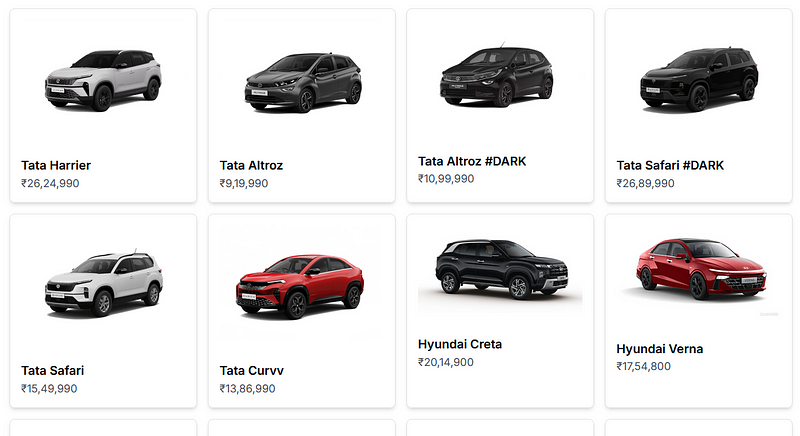
Here’s the output that I get:
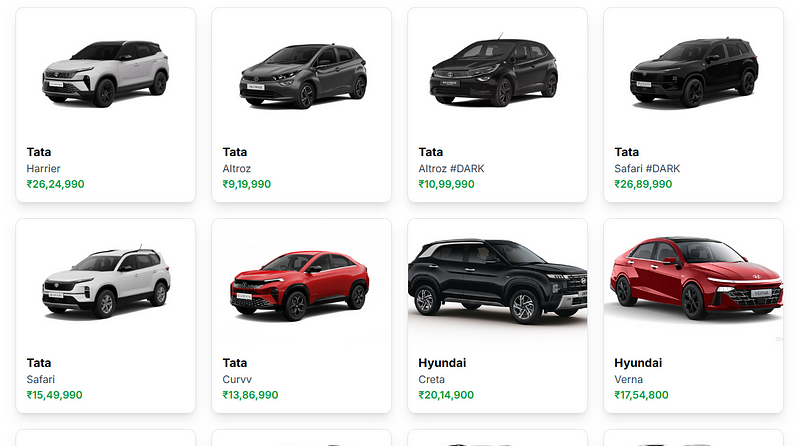
Quite cool, right?
Although the color selection for the price is debatable but it is a kind of a simple but good looking UI.
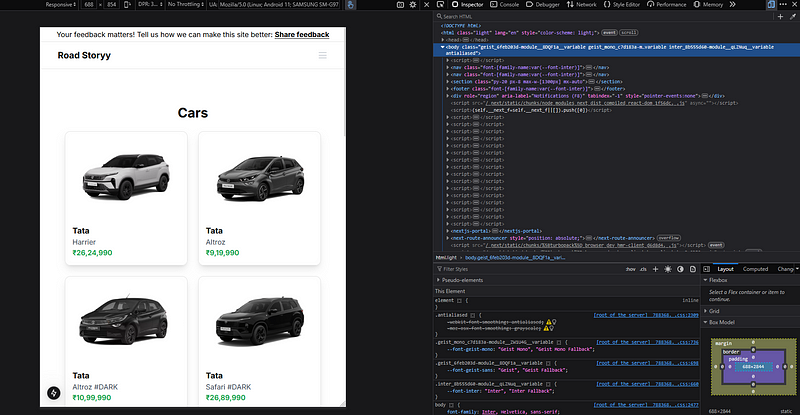
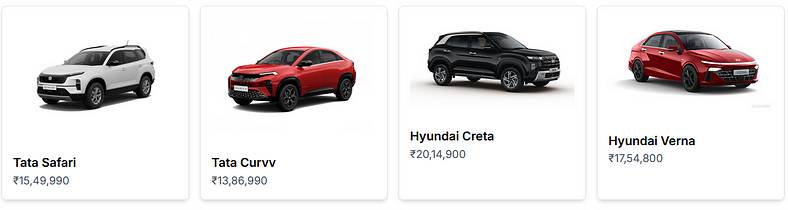
It is responsive as well:
Final code:
<div className="grid grid-cols-1 sm:grid-cols-2 md:grid-cols-3 lg:grid-cols-4 gap-6">
  {cars.map((car) => (
    <Card key={car._id} className="overflow-hidden shadow-lg">
      <img
        src={car.img.url}
        alt={`${car.brand} ${car.model}`}
        width={400}
        height={250}
        className="w-full h-48 object-cover"
      />
      <CardContent className="p-4">
        <h3 className="text-lg font-bold">{car.brand}</h3>
        <p className="text-gray-600">{car.model}</p>
        <p className="text-green-600 font-semibold">
          {car.price.ex_showroom}
        </p>
      </CardContent>
    </Card>
  ))}
</div>
Gemini
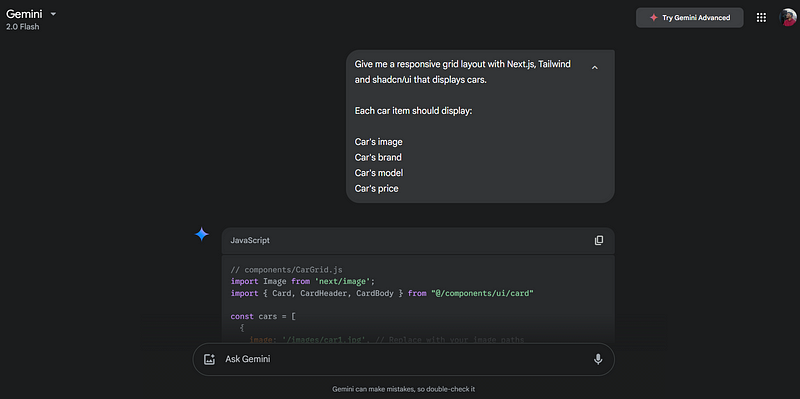
Here’s the code Gemini provided me with:
// components/CarGrid.js
import Image from 'next/image';
import { Card, CardHeader, CardBody } from "@/components/ui/card"

const cars = [
  {
    image: '/images/car1.jpg', // Replace with your image paths
    brand: 'Toyota',
    model: 'Camry',
    price: '$25,000',
  },
  {
    image: '/images/car2.jpg',
    brand: 'Honda',
    model: 'Civic',
    price: '$22,000',
  },
  {
    image: '/images/car3.jpg',
    brand: 'Tesla',
    model: 'Model 3',
    price: '$40,000',
  },
  // ... more car data
    {
    image: '/images/car4.jpg', // Replace with your image paths
    brand: 'BMW',
    model: 'M5',
    price: '$80,000',
  },
  {
    image: '/images/car5.jpg',
    brand: 'Mercedes-Benz',
    model: 'C-Class',
    price: '$50,000',
  },
  {
    image: '/images/car6.jpg',
    brand: 'Audi',
    model: 'A4',
    price: '$45,000',
  },
];

const CarGrid = () => {
  return (
    <div className="grid grid-cols-1 sm:grid-cols-2 md:grid-cols-3 lg:grid-cols-4 gap-4 p-4">
      {cars.map((car, index) => (
        <Card key={index} className="bg-white rounded-lg shadow-md"> {/* Added rounded corners and shadow */}
          <CardHeader className="p-4">
          <Image
              src={car.image}
              alt={`${car.brand} ${car.model}`}
              width={500} // Adjust width as needed
              height={300} // Adjust height as needed
              className="object-cover rounded-t-lg" // Rounded top corners for image
            />
          </CardHeader>
          <CardBody className="p-4">
            <h3 className="text-lg font-semibold">{car.brand} {car.model}</h3>
            <p className="text-gray-600">{car.price}</p>
          </CardBody>
        </Card>
      ))}
    </div>
  );
};

export default CarGrid;
Here too, I need the grid layout, so I will just take this code:
<div className="grid grid-cols-1 sm:grid-cols-2 md:grid-cols-3 lg:grid-cols-4 gap-4 p-4">
  {cars.map((car, index) => (
    <Card key={index} className="bg-white rounded-lg shadow-md"> {/* Added rounded corners and shadow */}
      <CardHeader className="p-4">
      <Image
          src={car.image}
          alt={`${car.brand} ${car.model}`}
          width={500} // Adjust width as needed
          height={300} // Adjust height as needed
          className="object-cover rounded-t-lg" // Rounded top corners for image
        />
      </CardHeader>
      <CardBody className="p-4">
        <h3 className="text-lg font-semibold">{car.brand} {car.model}</h3>
        <p className="text-gray-600">{car.price}</p>
      </CardBody>
    </Card>
  ))}
</div>
I will update the values of the below attributes according to my API response:
src={car.img.url}{car.price.ex_showroom}- Changed the Next.js
<Image>component to the native HTML<img>tag.
Output
Responsiveness

Final code
<div className="grid grid-cols-1 sm:grid-cols-2 md:grid-cols-3 lg:grid-cols-4 gap-4 p-4">
  {cars.map((car, index) => (
    <Card key={index} className="bg-white rounded-lg shadow-md">
      {" "}
      {/* Added rounded corners and shadow */}
      <CardHeader className="p-4">
        <img
          src={car.img.url}
          alt={`${car.brand} ${car.model}`}
          width={500} // Adjust width as needed
          height={300} // Adjust height as needed
          className="object-cover rounded-t-lg" // Rounded top corners for image
        />
      </CardHeader>
      <CardContent className="p-4">
        <h3 className="text-lg font-semibold">
          {car.brand} {car.model}
        </h3>
        <p className="text-gray-600">{car.price.ex_showroom}</p>
      </CardContent>
    </Card>
  ))}
</div>
Issues Faced
Faced an issue with Gemini’s output.
It had a <CardBody> component inside <Card>, which is not defined in shadcn/ui, so it gave me an error.
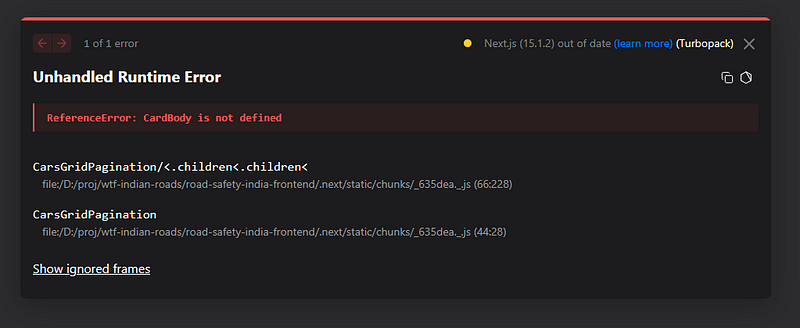
It should have been <CardContent> instead.
Verdict
Both the outputs were good looking UIs and were responsive as well. They provided the code by including the Next.js optimized <Image> component, which is quite good.
Notice that there’s a major difference between both the responses.
ChatGPT didn’t provide any padding on the image, so the images on Creta and Verna are touching the sides of the their cards, which doesn’t look good.
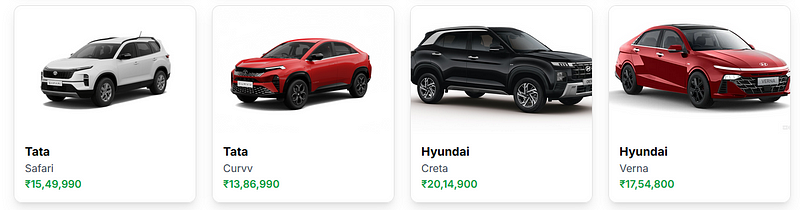
Whereas Gemini’s response did include the padding but it didn’t have the perfect card alignment. The image size isn’t proper, so the car’s name and price do not align to the bottom of the card.
Gemini’s response also had an incorrect component inside the <Card> of shadcn/ui, but the UI still looks good because
- Color selection for car price was good and easy on the eyes instead of the bright green color.
<p className="text-gray-600">{car.price.ex_showroom}</p>
What do you think?
3. Data Extraction from an Image
Once, I was given a task to extract the data from an image and convert it into an HTML table. So I turned to ChatGPT and Gemini for this.
Let’s pick an image that we want to convert to an HTML table.

The above asset is an image instead of an HTML table, so it is not in a text format and hence, we cannot copy any text inside a cell in this table.
We will let the tools handle this.
Prompt: “Extract data from this image and convert it into an HTML table”
ChatGPT
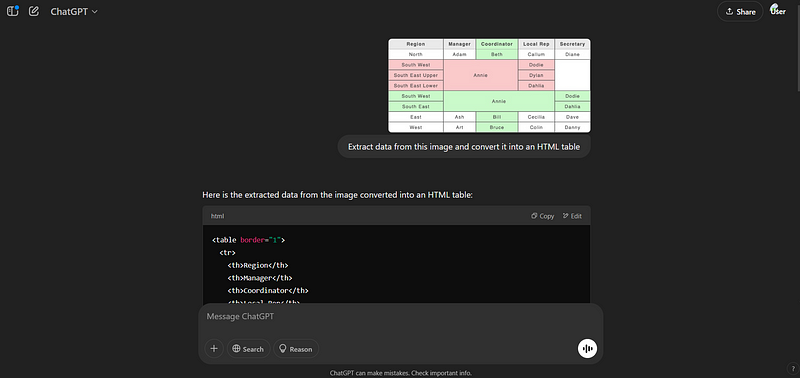
Couldn’t create a link for this as ChatGPT doesn’t support sharing links that contain images in the prompts 🙁
Here’s the code it provided:
<table border="1">
  <tr>
    <th>Region</th>
    <th>Manager</th>
    <th>Coordinator</th>
    <th>Local Rep</th>
    <th>Secretary</th>
  </tr>
  <tr>
    <td>North</td>
    <td>Adam</td>
    <td style="background-color: lightgreen;">Beth</td>
    <td>Callum</td>
    <td>Diane</td>
  </tr>
  <tr>
    <td rowspan="3" style="background-color: lightcoral;">South West</td>
    <td rowspan="3" style="background-color: lightcoral;"></td>
    <td rowspan="3" style="background-color: lightcoral;">Annie</td>
    <td style="background-color: lightcoral;">Dodie</td>
    <td rowspan="3"></td>
  </tr>
  <tr>
    <td style="background-color: lightcoral;">Dylan</td>
  </tr>
  <tr>
    <td style="background-color: lightcoral;">Dahlia</td>
  </tr>
  <tr>
    <td style="background-color: lightgreen;">South West</td>
    <td style="background-color: lightgreen;"></td>
    <td style="background-color: lightgreen;">Annie</td>
    <td style="background-color: lightgreen;">Dodie</td>
    <td style="background-color: lightgreen;"></td>
  </tr>
  <tr>
    <td style="background-color: lightgreen;">South East</td>
    <td style="background-color: lightgreen;"></td>
    <td style="background-color: lightgreen;">Annie</td>
    <td style="background-color: lightgreen;">Dahlia</td>
    <td style="background-color: lightgreen;"></td>
  </tr>
  <tr>
    <td>East</td>
    <td>Ash</td>
    <td style="background-color: lightgreen;">Bill</td>
    <td>Cecilia</td>
    <td>Dave</td>
  </tr>
  <tr>
    <td>West</td>
    <td>Art</td>
    <td style="background-color: lightgreen;">Bruce</td>
    <td>Colin</td>
    <td>Danny</td>
  </tr>
</table>
Output
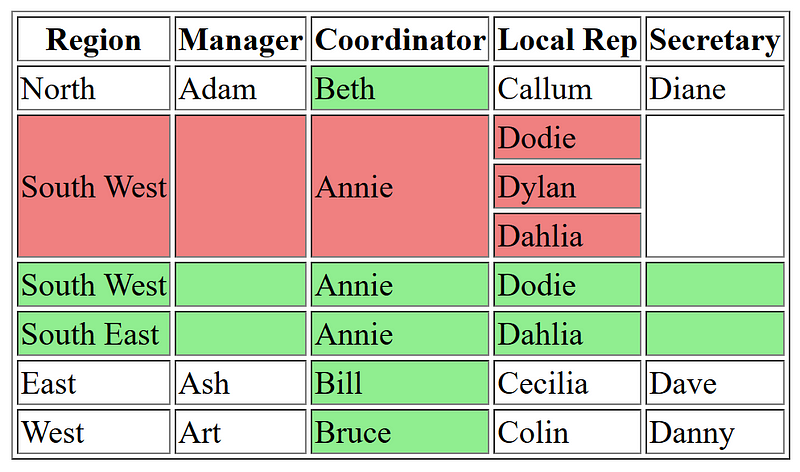
Cool, the table is formed but notice, how ChatGPT has added background colors too!
But the data isn’t accurate.
Gemini
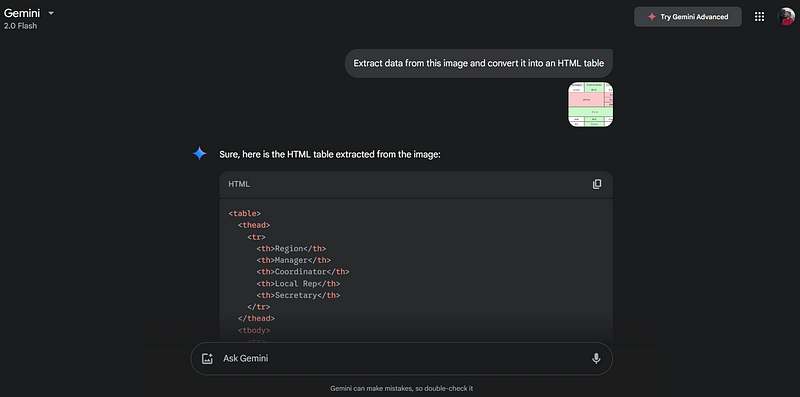
Code by Gemini
<table>
  <thead>
    <tr>
      <th>Region</th>
      <th>Manager</th>
      <th>Coordinator</th>
      <th>Local Rep</th>
      <th>Secretary</th>
    </tr>
  </thead>
  <tbody>
    <tr>
      <td>North</td>
      <td>Adam</td>
      <td>Beth</td>
      <td>Callum</td>
      <td>Diane</td>
    </tr>
    <tr>
      <td rowspan="2">South West</td>
      <td rowspan="2"></td>
      <td rowspan="2">Annie</td>
      <td>Dodie</td>
      <td></td>
    </tr>
    <tr>
      <td></td>
      <td>Dodie</td>
    </tr>
    <tr>
      <td>South East Upper</td>
      <td></td>
      <td></td>
      <td>Dylan</td>
      <td></td>
    </tr>
    <tr>
      <td>South East Lower</td>
      <td></td>
      <td></td>
      <td>Dahlia</td>
      <td></td>
    </tr>
    <tr>
      <td rowspan="2">South East</td>
      <td rowspan="2"></td>
      <td rowspan="2">Annie</td>
      <td></td>
      <td>Dahlia</td>
    </tr>
    <tr>
      <td></td>
      <td>Dahlia</td>
    </tr>
    <tr>
      <td>East</td>
      <td>Ash</td>
      <td>Bill</td>
      <td>Cecilia</td>
      <td>Dave</td>
    </tr>
    <tr>
      <td>West</td>
      <td>Art</td>
      <td>Bruce</td>
      <td>Colin</td>
      <td>Danny</td>
    </tr>
  </tbody>
</table>
Output
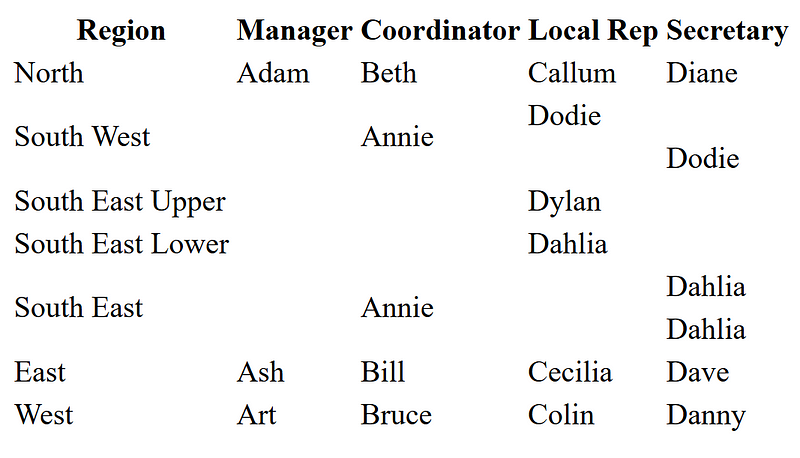
Here though, no background color 🙁
Also, inaccurate data.
Difference
- The instant difference between the two outputs is that ChatGPT added borders in the table whereas Gemini didn’t.
- Additionally, ChatGPT tried to retain the styles from the original image as much as possible, that’s why we see the red and green colors for some of the rows in the HTML table.
- Functionality wise, both the outputs are inaccurate however, Gemini might be more accurate than ChatGPT here as if we do some manual edits, Gemini’s output should take less time to make it 100% accurate.
Conclusion
Okay, so there can be more criteria on the basis of which, both these tools can be compared such as debugging, etc. But to me, both are fine as combined with a bit of my own effort plus their output, the job gets done.
But…
Which one is better according to you? Any inputs?
Read more: Use This AI Tool to Generate Alphabets Out of Anything